
Vue Bulma Starter App
Ideas spring up at the weirdest times. They rarely keep office hours and keep me awake unless I action at least a prototype level of it. The thing I find that generally takes the longest is setting up a clean workspace and setup that will satisfy a deployed prototype. I use Netlify to host my static apps.
TL;DR
I created a starter vue cli + bulma single page progressive web application that I can clone for faster setup to get going on my idea rather than to spend time setting up without a line of code.
I want to talk about the features I used and the flexibility this provides when getting started.
Custom Service Worker
A basic requirement for me was the reload content capability using the service worker to help the user reload to fresh content when a deploy goes live. Due to the rapid nature of prototyping things, changes occur very often so making that easy for people to see adds a lot of value. I adapted the code from an article I read over custom service workers in a vue cli 3 app. The article explains fully the steps it takes to build this and why they are necessary.
vue.config.js
module.exports = {
    pwa: {
        workboxPluginMode: "InjectManifest",
        workboxOptions: {
            swSrc: "src/service-worker.js"
        }
    }
}
/src/service-worker.js
self.__precacheManifest = [].concat(self.__precacheManifest || []);
workbox.precaching.suppressWarnings();
workbox.precaching.precacheAndRoute(self.__precacheManifest, {});

// install new service worker when ok, then reload page.
self.addEventListener("message", msg=>{
    if (msg.data.action=='skipWaiting'){
        self.skipWaiting()
    }
})
/src/registerServiceWorker.js
/* eslint-disable no-console */
import { register } from 'register-service-worker'
if (process.env.NODE_ENV === 'production') {
register(`${process.env.BASE_URL}service-worker.js`, {
ready() {
console.log(
'App is being served from cache by a service worker.\n' +
'For more details, visit https://goo.gl/AFskqB'
)
},
registered() {
console.log('Service worker has been registered.')
},
cached() {
console.log('Content has been cached for offline use.')
},
updatefound() {
console.log('New content is downloading.')
},
updated(registration) {
console.log('New content is available; please refresh.')
let confirmationResult = confirm(
'New content found! Do you want to reload the app?'
)
if (confirmationResult)
registration.waiting.postMessage({ action: 'skipWaiting' })
},
offline() {
console.log(
'No internet connection found. App is running in offline mode.'
)
},
error(error) {
console.error('Error during service worker registration:', error)
}
})
let refreshing
navigator.serviceWorker.addEventListener('controllerchange', e => {
if (refreshing) return
window.location.reload()
refreshing = true
})
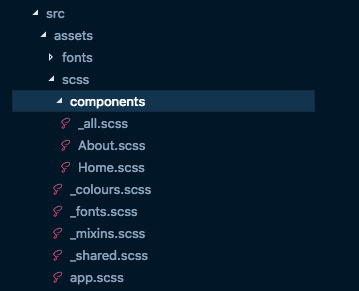
}Extending Bulma
This was the main focus for me to automate. Extending bulma is tricky but not impossible. Bulma also has documentation on how to extend their framework.
/src/assets/scss/app.scss
@charset "utf-8";

@import './_shared';
@import './_mixins';

@import 'node_modules/bulma/sass/base/_all';
@import 'node_modules/bulma/sass/elements/_all';
@import 'node_modules/bulma/sass/grid/_all';
@import 'node_modules/bulma/sass/components/_all';
@import 'node_modules/bulma/sass/layout/_all';

/* Buefy UI components */
//@import 'node_modules/buefy/src/scss/buefy'; // Uncomment to use

/* Better row level spacing so no more overlap */
.columns {
    margin-top: 0;

    &:last-child {
        margin-bottom: 0;
    }
}

/* 4K screens override */
.container {
    @include desktop() {
        &.is-ultra-widescreen-fluid {
            margin-left: $gap;
            margin-right: $gap;
            max-width: none;
            width: auto;
        }
    }
    @include ultra-widescreen() {
        &.is-ultra-widescreen-fluid {
            margin: auto;
            max-width: $ultra-widescreen;
            width: auto;
        }
    }
}

/* Components */
@import 'components/_all';
app.scss is the main entrypoint into the application stylesheet and it references the various areas of concern while allowing you to extend things.
/src/assets/scss/_shared.scss
This is where most of the framework level overrides and customisations happen. You have to load the bulma files in order and drop in your replacements and/or overrides for the rest of the framework to propagate from.
// Import business fonts
@import "_fonts";

@import "node_modules/bulma/sass/utilities/initial-variables";
@import "node_modules/bulma/sass/utilities/functions";

$border: $grey-lighter !default;
@import "node_modules/bulma/sass/utilities/mixins";

// Import Business main color scheme
@import "_colours";

/** Application variables and overrides */
$family-primary: "Avenir-Book", -apple-system, system-ui, "Helvetica Neue", "Helvetica", "Arial", sans-serif !default;
$family-light: "Avenir-Light", -apple-system, system-ui, "Helvetica Neue", "Helvetica", "Arial", sans-serif !default;
$family-medium: "Avenir-Medium", -apple-system, system-ui, "Helvetica Neue", "Helvetica", "Arial", sans-serif !default;
$family-heavy: "Avenir-Heavy", -apple-system, system-ui, "Helvetica Neue", "Helvetica", "Arial", sans-serif !default;
$family-black: "Avenir-Black", -apple-system, system-ui, "Helvetica Neue", "Helvetica", "Arial", sans-serif !default;
$body-background-color: hsl(0, 0%, 99%) !default;
$body-size: 16px !default;
$body-rendering: optimizeLegibility !default;
$body-family: $family-primary !default;
$body-color: $grey-heading !default;
$body-line-height: 1.618 !default;

$hr-background-color: hsl(0, 0%, 95%) !default;
$hr-height: 1px !default;

$table-background-color: $body-background-color !default;
$table-cell-border: 0 !default;
$table-cell-padding: 0.5em 0;

$weight-hairline: 100 !default;
$weight-lighter: 200 !default;

/* Framework overrides */
$navbar-box-shadow-size: 0;

@import "node_modules/bulma/sass/utilities/derived-variables";
@import "node_modules/bulma/sass/utilities/controls";
@import "node_modules/bulma/sass/utilities/animations";

/** Framework overrides */
$link: $grey-heading;
$ultra-widescreen: 1680px + (2 * $gap) !default;
/src/assets/scss/_fonts.scss
Example of the custom loaded fonts that your application will use.
@font-face {
    font-family: 'Avenir-Book';
    src: url('assets/fonts/Avenir-Book.eot');
    src: url('assets/fonts/Avenir-Book.eot?#iefix') format('embedded-opentype'),
    url('assets/fonts/Avenir-Book.svg#Avenir-Book') format('svg'),
    url('assets/fonts/Avenir-Book.ttf') format('truetype'),
    url('assets/fonts/Avenir-Book.woff') format('woff'),
    url('assets/fonts/Avenir-Book.woff2') format('woff2');
    font-weight: normal;
    font-style: normal;
}
/src/assets/scss/_mixins.scss
Example of your mixins file.
@import './_shared';

@mixin ultra-widescreen() {
    @media screen and (min-width: $ultra-widescreen) {
        @content
    }
}

@mixin rounded($radius: 3px) {
    -webkit-border-radius: $radius;
    -moz-border-radius: $radius;
    border-radius: $radius;
}
/src/assets/scss/_colours.scss
Example of your colours file. This is where you would add more color variables if your palette requires.
$grey-lightest: hsl(0, 0%, 95%) !default;
$grey-heading: hsl(0, 0%, 28%) !default; //#484848

.has-background-grey-lightest {
    background-color: $grey-lightest;
}
/src/assets/scss/components/Home.scss
You would extract all the component level styles into their own files.
.home {
    .hero {
        -webkit-background-size: cover;
        -moz-background-size: cover;
        -o-background-size: cover;
        background-size: cover;
        background: linear-gradient(
            to top,
            rgba(0, 0, 0, 0),
            rgba(0, 0, 0, 0.8)
          ), url('/img/responsive/kara-eads-1297668-unsplash_w_2180.jpg') no-repeat 45% 45%;
        background-color: $grey-darker;
    }

    h1 {
        font-family: $family-black;
        font-weight: 800;
    }

    h2 {
        font-family: $family-black;
        font-weight: 800;
    }
}
Putting it all together
Loading your extended Bulma is as simple as importing your base scss into the top level vue component and letting webpack take care of the rest.
/src/App.vue
<template>
    <div id="app">
        <router-view/>
    </div>
</template>

<style lang="scss">
    @import "assets/scss/app";
</style>
Summary
A simple but effective way to get started using vue cli 3 alongside bulma that can easily be extended. Sometimes you only want to use the flex layout and other times the form components. I hope to extend this even more to be able to satisfy many more use cases but for the time being I got three prototypes up in a weekend and deployed to Netlify.
I consider that a win.
Cover photo by Jan Antonin Kolar.